Tuesday 29 December 2015

The End of 2015

Well, it's almost New Year. I almost cannot believe the year has gone so fast, but at the same time so much has happened. This time last year I was in Rome, now I have spent the evening planning a pattern sale dash.

Life:
I got married at the end of 2014, so that has really been the big change this year. The wedding was handmade vintage style, the masterpiece being my wedding dress. Even now, over a year later, thinking about the insertion, pintucks, vintage lace and hand embroidery makes me so happy. We celebrated our first wedding anniversary a couple of weeks ago, and it's been a fantastic year beginning our lives together.

We honeymooned in Europe from December through February which was an incredible experience. Europe, especially the UK has been a dream of mine since I was a little girl. I am a committed Anglophile, and my first time there did not disappoint. Below is myself in the Lake District, the scenery and atmosphere of England and Scotland is breath taking, whether it's out driving a snow storm in the Highlands, or climbing to the roof of a cathedral. Before the UK, we visited Germany, Prague, Salzburg, Italy and France. It was a real adventure, and has certainly whetted my appetite for more travel.

Life since February has certainly been quieter! We are renting a little one bedroom apartment in Sydney's Inner West. Living out of home, and in the city has been an adjustment, but I enjoy it, and it's been very satisfying to be able to build up our first home.

Most of the year was taken up with completing my history honours. Honours in Australia is a year long research programme in under grad that results in a 20,000wd thesis. It was fun, rewarding, and grueling. My area of specialty is medieval history,  specifically for my thesis it was twelfth century historical writing in Anglo-Norman England, and the creation of an English national identity post Conquest.

Next year I will be beginning my Masters in Museum and Heritage Studies, with the aim of moving to the UK permanently in a few years, and working in something heritage related. History is really my life blood; from academic study, reading for pleasure, TV shows and movies, and even my dress style.

Sewing:
Closed eyes. Oh dear, posing for photos has never been my forte
This year has been quiet on the sewing front. I have been very happy with the projects I have made. My blog archives only show ten blogged projects, several that were UFO's that got neglected with the wedding dress making. the vast majority of these projects have been successes though! My favourites are my vintage floral shirtdress and my Liberty Mathilde blouse.

I do though have a number of half finished projects. I have certainly been doing a good bit of sewing, just not a lot has resulted in finished items, and I have a few that are yet to be blogged.


My Liberty Mathilde. The photos of the finished blouse came out poorly

The main issue with sewing this year has been getting used to the space. At my Mum's I had use of a studio/granny flat in the backyard. I had a pretty good set up which allowed me to make a lot of mess and not be in anyone's way. I also had a very large cutting table.

This year I sew in the bedroom, and have to try and not leave pins all over the floor, whilst sharing the space with the ever patient, ever loving husband. My stash space is also a lot smaller (it hasn't stopped me bringing down a lot of stuff). I feel like I am finally getting hold of the space, and in the next few weeks I will hopefully be getting the cutting table again! It will live folded up in the corner, and will make things a lot easier.

I made my first collars this year, and I found them not scary at all, may 2016 be the year of bound button holes and tailoring! I also had my first experience sewing with polyester. And I will be sticking to natural fibres from now on. The dress was a gift, so I am glad it's an easy wash and wear for her, but the sewing aspect was less than pleasant.

On the internet based side of sewing I made two steps forward this year. The first was getting Instagram. I really love it, and enjoyed taking part in #sewvember. I am slowly dragging myself into the modern world! I also tried to open an Etsy shop with some of the accessories I had been making. It didn't take off, but I have a few plans for attempting to revitalize it next year.

Style:
My biggest style step forward this year was working out how to curl my hair! This was a big step forward for me. I have very nice, very thick hair. Ever since I started school it's never been longer than shoulder length (any longer and it's so thick it's unmanageable). I would usually just do pony tails, or clip it back at the sides. This year I decided to take the plunge, and do rag curls. My best friend has done them on me a number of times over the years, and she even did them for my wedding. It was so incredibly easy once I just took the plunge, and now I can do nice updos. I am happier with my hair than I have been in years. I even started cutting it myself, which is much less scary than it sounds.

My style has remained relatively unchanged this year, though I have thrown some pencil skirts and shirt dresses into the mix. My summer outfit is still a fit and flare floral dress, or a skirt with a cream/lace/floral blouse. Winter is all about pleated wool plaid skirts.


Plans for 2016:
My sewing plans for next year go hand in hand with my style plans. I love vintage, and want to expand my vintage wardrobe. To this end I am making a trip tomorrow to buy a lot of Simplicity and Butterick reproduction patterns on sale. I will share them with you once they are safely mine!
my general sewing plans include more floral blouses, as most of my blouses are white and cream. Going to see Suffragette this week did not help my Edwardian blouse obsession. I also want to make some more summer skirts.

Dress wise, I want to move beyond the fit and flare. Everything will still be defined waist, but I am wanting to experiment sewing wise. There will be many more M6696 shirtdresses, but I have become very taken with a lot of the 1940's style bodices, so I will probably end up trying a few dresses in those styles.

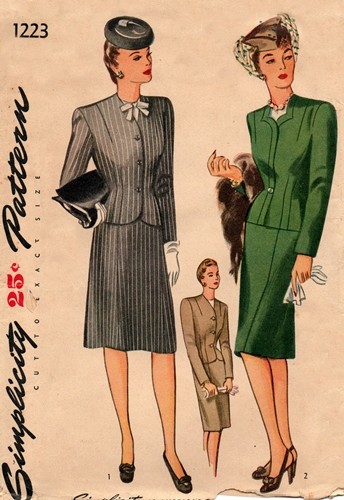
I am also going to make myself a suit, with my first vintage pattern bought online. The bad Australian exchange rate and postage make online shopping not a good deal, which is probably good for my hip pocket in the long run! Isn't it a beauty?

My other great plan is to get into scarves, both neck scarves, and hair scarves. And if the vintage gods smile on me 2016 may finally be the year of the hat. I own a grand total of one hat, which is the only hat that has ever fit my head. My family has five documented generations of incredibly large heads, and it's something I have come to live with. Hats will never fit, and some garments will be a struggle to get over your head. I am hoping I turn up some good ones in the coming year. The second hand shops here often aren't very forthcoming with things like that.

My other dream is to find a good haul of 1940s and 1950s patterns at the opshop for hardly any money, but I do not think that is likely to happen.


Well, that ended longer than expected! It's been a good year all up, and I am more than excited thinking through all my plans for next year. Do let me know what you are planning. Following all your blogs and Instagrams is what gives me the best sewing and style inspiration! And I promise I will be back soon with the expected pattern haul.


Sunday 20 December 2015

Purple silk refashioned blouse


Today's newly finished item is a refashion. Years ago, I bought this purple silk blouse at one of those opshops where you buy by the kilogram. I picked up a lot of silk that day for about 50c each. I wore the blouse as I bought it for a few years until I decided it needed a change. It was quite loose fitting, had a stiff collar, and dropped shoulder sleeves.

I actually started this months ago. Second picture down is once I cut off the sleeves and collar. I gave it some side seam shaping, and turned the dropped shoulder effect into a kimono sleeve. In the picture of me wearing it you can see the buttons aren't sitting quite right. I don't think it's an issue of it being tight across the bust, The buttons are widely spaced, and I think a press stud there should do the trick.

The reason this took so long to finish was the binding. I tried a rolled hem, but it wouldn't take, so in the end I cut the neckline down into a V, and finished all the edges with pre made mauve bias tape whilst watching Call the Midwife.

All up, a quick project, and I think it will get a lot of wear over the summer

Tuesday 24 November 2015

Lace Insertion blouse

Even though I haven't posted for about a month, I sill have been very busy on the sewing front, just not a lot to show in the way of finished objects! I have been posting a lot on instagram though, especially with #bpsewvember photo a day challenge this month. If you are not yet following me, my handle is @kaitlynssimplyvintage. There's a lot of close up of beautiful floral fabric happening over there.

Today's project has been over a year in the making. When making my wedding dress, I made a number of test garments (because making a wedding dress on a tight deadline definitely leaves time to make even more things). There were three test garments all up, this one, my Armistice blouse, and a skirt that needs taking in.

This blouse was a test run for lace insertion. I used this tutorial by Wearing History. The fabric is a very delicate, and incredibly sheer Swiss dot form my grandmother's stash, and the lace is inherited as well.

For the pattern I used Tilly and the Button's Mathilde blouse, without sleeves.

The insertion was added across the yoke, and then more lace was added to the armhole. The fabric frayed a lot, so I finished the neckline with self bias tape top stitched down.

At this point, knowing I could insert lace, I put this aside and got on with the wedding dress. One issue was how sheer it was, everything was visible. I thought about it being a lounging top, but both my Mum and sister thought it was too pretty for that.

A few weeks ago, I pulled this out and go around to finishing it. I had thought about putting buttons down the back, but the fabric frays so much, I just sewed down the back seam, leaving a little extra ease, so the top pulls over. I quickly hemmed it, and it was done. I love when long term unfinished objects come together like that.

 The main problem was then deciding what to wear it with. In the end I went for a plain white singlet, which worked well, but only because it was relatively cool. I am thinking this would also look good with some coloured camisoles underneath. More sewing plans I guess!

I paired it yesterday with a navy and white polka dot maxi skirt (hand-me-downs from Mums are the best). Thinking this will go with pretty much any skirt, especially some nice florals.

Will hopefully have some more finished objects to show you soon. Have a lovely shirtdress half made, and also am hoping to tackle my large refashion/mending pile sooner rather than later

Saturday 31 October 2015

Vintage Floral Shirtdress

A long held sewing dream has been realised. I have finally made M6696. After seeing many amazing versions, especially all of Mary's and Heather's (I would steal both of these lady's wardrobes in a heartbeat), I knew I had to get hold of the pattern. I finally bought it a few months ago and it went on the back burner til after my thesis was finished.

Though the plan is to make many of these dresses, my specific plan was to use up the rest of my bridesmaids dress fabric. But because this fabric is very special, I knew I needed a wearable muslin first.

At first I wasn't too sold on this fabric. I picked it up very cheap at a market a while back (it was either fabric-a-brac, or the closing down sale of my local vintage shop). It's very 60's/70's, and was also very narrow. And even though I am a massive fan of florals, I felt it was a little too girly. I thought a shirt dress would work well, as the more structured lines would make less girly. However, after making and wearing this dress, I love the fabric. Funny how that happens.


I made a few minor changes to the pattern. I really do not like the back gathers that come with the pattern, so I modified the back pattern piece to the darts of Simplicity 2444. This was also a trick I did with my wedding dress. Secondly I shortened the waist half an inch. This makes a massive difference. I am finding a few of my older dresses are too long in the waist, so this will be a standard adjustment from now on. For reference I cut a size 12 with the A/B cup.

I also modified the skirt slightly, but this was to do with the width of the fabric. The fabric wasn't wide enough to take the full pleated skirt. I deliberated on using the straight skirt option, but I was concerned it would need a bit of fitting over the hips, so stuck with the fuller option. My modifications were very unscientific. The waist seam just fit across the width, and then I folded in the rest of the pattern to fit.

The dress went together really easily. I used Four Square Wall's collar tutorial and it went in smoothly first go. I hand sewed down everything.

Pattern: McCall's 6696

Size: 12A/B

Fabric: Vintage floral, picked up second hand

Adjustments: Back gathers to darts, shortened waist, narrowed skirt

Notions: Pink shank buttons from Reverse Garbage

Wear with: pink pearl set, and pink ballet flats

Make again? Yes, I am hoping this pattern will become a TN.

Hoping to be back soon with the bridesmaid dress fabric version


Wednesday 28 October 2015

Just a very quick post to let you know I've opened an Etsy shop. https://www.etsy.com/shop/KaitlynSimplyVintage
Currently am only offering shipping within Australia.

Sunday 18 October 2015

Liberty Mathilde Blouse

After handing in my thesis almost a fortnight ago I have my sewing time back, which has resulted in a flurry of activity. The first project was a WIP that  had started way back in March.

This gorgeous liberty print was bought last May at the Fabric-a-brac fabric sale in Stanmore, Sydney (a day I remember well as I got engaged that evening). I paid  $8 for around a metre. I still have a good bit left over. I absolutely love Liberty fabric, the quality is fantastic, and the prints speak to my very feminine, Anglophile, country garden and flowers loving heart.

I knew I wanted to make a summer blouse, so I turned to Tilly and the Button's Mathilde blouse. I am planning on branching out and trying a new blouse pattern at some point (five versions in), but I love this pattern, and knew that with a few modifications it would work well to showcase the print with little distraction.

I eliminated the front tucks, and also changed the sleeves. The sleeve pattern is actually cut from the sleeve head of one of husband's worn out shirts. I had tried a few other sleeve patterns, but found them all restrictive of movement, and I was having trouble leveling off the Mathilde sleeve pattern.

The back closes with some beautiful green vintage buttons I bought in the Rocks (a historical, artsy area of Sydney). When sewing them on, I couldn't help but do a colour coordinated photo in this little Royal Albert dish. It certainly pulls together my love of crockery and sewing.


The finished garment photo isn't too clear unfortunately. There was a good bit of glare, and I didn't realise til later one sleeve was caught up. Oh well, I have good close ups of the fabric, and the picture gives a good indication of how it looks worn.


Pattern: Tilly and the Buttons Mathilde

Size: 3

Fabric: Liberty Tana lawn, Fabric-a-brac sale

Adjustments: No pleats in front, modified sleeve pattern, lowered neckline

Notions: Green vintage buttons from the Rocks

Wear with: my black skirts, my pink skirt, the as yet made blue skirt. The colours give me a lot of options. It also goes equally well with my cream or pink pearls.

Make Again: I m on the look out for more vintage blouse patterns, but this Mathilde modification will most likely come out again ( I actually have a refashion waiting to be blogged)


Hope you have all been having a good week.


Sunday 11 October 2015

Liebster Award

I was nominated by Beth at Sewing Soothes the Soul for the Liebster Award. I'm going to share eleven random facts about myself. Instead of nominating a few other bloggers, I'm going to leave it open if anyone wants to pick it up for themselves; there's simply too many blogs I enjoy to pick and choose!

1. I study medieval history, and only handed in my honours thesis last week. I am now deciding what to pursue next year.

2. I am a dedicated coffee drinker (who also drinks tea), and I love nothing more than a good cappuccino. Luckily Sydney has a very good coffee culture, which is something I missed a lot when in Europe.

3. I have a novel draft written based on a very dense fictional genealogy I have developed.

4. I have scoliosis, which is a curvature of the spin. I got to wear a very uncomfortable plastic back brace for a year when I was 12 to stop it getting any more out of alignment.

5. I was bitten by a red belly black snake when I was fourteen months old.

6. I collect vintage china

7. My Dad passed away from cancer when I was 14. It was the worst experience of my life, but I am so grateful for the time I had with him

8. I met my husband in my second week of university, during a getting to know you exercise in a tutorial.

9. As a kid my favourite books were Enid Blyton, then I discovered Jane Austen and the Bronte sisters, and quickly became a devoted fan of classic literature.

10. Though I am Australian I have never felt much connection to my own country, instead I am a devoted Anglophile. I love English history, literature, countryside, architecture, culture etc. Getting to finally visit the UK on my honeymoon was a dream come true. We are planning on moving there in a few years.

11. I collect vintage crockery. Like my fabric collection,I unabashedly love florals of all sorts, especially the vintage sort.

Thursday 17 September 2015

An entirely handmade outfit

 My staple of handmade items to this point has been dresses, but I am beginning to dream of many summer separates. I am itching to hand in my thesis so I can have days of uninterrupted sewing. However, my days are currently more filled with referencing, and questions of twelfth century English identity through historiography.

Last Saturday night I decided to just sew something. I needed a break. I only had a metre of this absolutely beautiful floral fabric. It's Japanese, and the hand of it feels almost like Liberty lawn. I bought it at a fabric market last year. I wanted something simple, so I decided to modify the bodice of BHL's Anna dress, one of my TNT patterns.


I cut both front and back on the fold, and added about five inches to the length. This was dictated by the limited amount of fabric. I just extended down the pleats. It was a incredibly quick sew. I finished the neck with bias tape, and put in a side invisible zip. I always wear things tucked in, so the hem is actually the selvage. Very pleased with myself I then ran into a significant fitting problem. I hadn't graded out the hips. I am very much a pear shape, and the blouse no had hips narrower than my waist. There was no way this was fitting. I thought about adding a peplum, but in the end the fix was quite simple. I unpicked all the pleats and darts to their original lengths, creating enough room in the hips. I was incredibly relieved. I then also made a matching hair scarf. It's a little thinner than my previous ones, so it was a bit more a struggle to catch in all my thick hair, but it worked!

The skirt was made a few months ago. The pattern is Simplicity 6862, a one metre, four gore 1970's skirt pattern. This will certainly be a TNT. The fabric is a light weight pink wool. I didn't line it to make it a quicker make; I have a very large collection of slips as it is.

So there is the first of my summer sewing projects. I have a new outfit, and all the pieces will be able to be mixed and matched as well.

Thursday 10 September 2015

Peasant style Mathilde blouse; my favourite ever make

Today's post has been about eighteen months in the making. Way back in February of last year I made  a Tilly and the Button's Mathilde blouse as a trial run for some lovely fabric I had in my stash. Probably within the month, I had made up my second version, pictured here. Eighteen months later I finally get it photographed.

This is hands down my favourite ever garment I have made. It is insanely comfortable, the fabric is gorgeous, and best of all I can wear it year round, it usually averages being worn at least once every ten days.

I made a few modifications to the pattern. Firstly I lowered the neckline, as it as too high originally. My other modifications were due to the drape of the fabric. I could not get the tucks to work at all, so instead I gathered the front for a more peasant style look Secondly, the neckline facing would not work with this fabric, as it frays a lot. I finished the neck with exposed bias tape, aas it was too see through to do it inside. The back closes with beautiful mother of pearl buttons.

This blouse is incredibly versatile. The fabric is very breathable, so even with the sleeves it can be a summer blouse on all but the hottest of days. In winter I layer it up with a full slip. It alo goes with a good majority of my skirts; all my black ones (the one here, black pencil, and long black pleated). It also gets a lot of wear in winter with my thick purple wool skirt and long blue coat. It will also go with some summer skirts I have in the works.

Will I make this pattern again? Certainly. The Mathilde pattern fits me really well, and there's a few versions sitting in the WIP pile as I write this.

I'm so glad I finally got around to sharing this. Do you have a favourite hand made garment that gets worn constantly?

Tuesday 1 September 2015

Ainrmistice blouse, wedding dress muslin.

I did post about my wedding dress here back in February, but never got around to writing much about design or construction. After two months away, I just wanted to share pictures, and a lot of the details had slipped my mind. However, I will be sharing a bit today, as last night I finally finished the wearable muslin of the top half of my wedding dress. 
My inspiration for my wedding dress was the Armistice blouse pattern. I cannot remember if I found the pattern first, or the Downton Abbey picture; I just loved the style, and quickly order the Folkwear pattern. My main tweaks to the pattern had to do with the back. The pattern is very blousey, and is nipped in with ties. I don't really like the excess fabric, and it didn't work with turning it into a dress, so I modified the back piece to incorporate back darts from Simplicity 2444, and this gave me a really good fit. After playing around with muslins, I decided to make a blouse up to practice the technqiues, especially the collar, lace and pintucking. I got the blouse mostly finished half way through last year, and it lay in the sewing pile, only with a hem to go, until last night. With the warmer weather creeping up in Sydney, and my desire to shrink my UFO pile, I quickly finished it lat night. 

It's a really comfortable blouse, and I like the style. My two issues are the front panel sits a tiny bit too low (something I can pull up; I do remember now raising the panel for my wedding dress). Also, the back is much too short. I most likely added no length, so it's the same length as a dress bodice. It makes it hard to tuck in; I am very short waisted, and am wearing it with a pencil skirt that hits my natural waist, and it only just sits in. These issues are certainly not going to stop me wearing it though. 

My favourite things about this blouse are the details. 
Firstly, the fabric. Most versions of this style I've seen as done in white/cream/ivory, but as I was already doing that for the wedding dress, I decided to go floral. The fabric is from my grandma's stash, and I used cream for the collar and front panel. 


My main construction change was to use bias tape instead of facings. I rally do not like facings, and had already found lovely satin bias for my wedding dress, so used a red bias tape for the facings. I also hemmed the blouse using bias tape, again much neater, and didn't lose much length. I did the button holes in blue, with blue buttons to match. I actually did not end up using buttons on my wedding dress, as the satin facings would not take them. I used false buttons with hooks and eyes underneath. For the blouse, I also inserted an invisible zipper up the side; I don't need it, because of the buttons, but it was good practice for the dress.

 This is a close up of the sleeve hem, finished with lace, which is machined on. Although I hand sew whenever I can, machining the lace actually gave it a very neat finish. All the lace was from my grandma's stash. I cut the sleeves short, not wantingto do cuffs, as per the pattern. I was actually planning on having short sleeves on the wedding dress, but ended up going thee quarters after getting carried away with insertion.

 This is a close up of the middle panel. The hardest part was getting the pintucks centred. I know I had a method, but my brain is very murky on the details now. The whole panel is handsewn into the blouse, and finished with a row of lace up top.

This is just a collar close up, he lace here is sandwiched between the two collar layers. 


Pattern Summary:
Pattern: Folkwear 210, Armistice blouse
Fabric: Floral for main body, cream for accents, both stash
Adjustments:
  • back turned into darts
  • bias tape facings
  • side zip
Notions: invisible zipper, blue buttons, red bias tape, a lot of lace

Wear with: a very high waisted, tight skirt. 

Make again? : I technically have for my wedding dress. I'm not sure if I would. I love the pattern, but its a blouse style that's very striking, and would look quite similar if made again, it's more of a statement piece, than a wardrobe basic. If I did make it again, I'd raise the front panel, add length to the back bodice, and grade out slightly at the hips. I do love the lace and pin tucking details though, so I will certainly be working out ways to incorporate them into future projects. 


I have two more projects to still show that were part of my wedding dress making process. One is a skirt, that was part of my self-drafting adventures, and the other is a blouse, that is still unfinished a year later where I set to work practicing insertion. 

It feels good to finally have another project finished, and shared. 
Thanks to my best friend Mim for the photos.


Tuesday 11 August 2015

English paper pieced hexagons


Today I thought I'd share my longest running sewing project; a English paper pieced queen sized bed quilt. This is the most I could get in one picture at a time. This quilt is big.
English paper piecing involves tacking fabric around cardboard shapes, then whip stitching them together. Usually people make flower rosettes. My quilt is completely random.

I began this years ago, sometime between the ages of nine and eleven. (I am 21 now). It began off innocently enough. One afternoon at my grandmother's she taught me how to make these hexagons. I sewed one rosette (which is now the centre of the quilt). I then decided I should turn it into a quilt, all fabrics being different to one another. I was always an ambitious and obsessive child.

The centre rosette. 
The quilt grew, and I decided I would get it finished for when I got married. At that point I assumed I would get married at around 30. When I was 19, and realised I wolud be getting married very soon, I decided to be sensible. I don't know If i will get it finished before I turn 30. I have the general size marked out. Each centre line is marked, and goes to the edge, which means the whole quilt is a wird cross shape at the moment, with large gaps at the corners which need filling

 The fabric is from all over the place; old projects, scrap boxes, and I hae even bought scrap bags on the internet. About a year ago I gave up on the no matching fabrics rule. My obsessiveness is waning slightly! I now just try to keep the matching ones relatively far apart.
There is no pattern to how pieces are placed, but i try and keep the colours mixed up as much as possible. Even randomness needs some plan behind it (especailly when a disproportionate amount of hexagons are blue florals. This combination to the right demonstrates how odd the quilt can get. A baby riding a dolphin sits under my mum's bridesmaid dress fabric.
 The quilt also acts as an I-spy quilt. There are numerous little characters, and animals on it, mainly from country style patchwork fabric. Here we have a novelty chicken. There are also cows, ducks, people, two geisha girls, snails, and rag dolls.
This gives you a bit more of an idea of what it look like overall. A number of years ago i counted 400 hexagons in this quilt. I now think the number is well over a thousand.
 One scrap bag I bought on Etsy had a lot of little Liberty scraps. I love scattering these through the quilt. This group also has a teddy bear, and some Christmas fabric.


There is fabric from all my old sewing projects in here as well. The blue and red floral is from this dress.

My plan is to eventually add a narrow cream border, and then hand quilt it. It's a real labour of love, an sewing tese hexagons together is incredibly addictive. The little papers end up scattered all through our apartment, and I'm constantly having to recollect them together, and assign them to their correct tins. (One for assembled hexagons, one for fabric and papers, one for paper clips).


Have any of you ever done any patchwork? I'm not sure how much overlap there is between patchwork and dressmaking blogs. I don't do much patchwork at the moment, but I am thinking over the next few months I will share all my past quilts on here. I have quite the collection.

Saturday 8 August 2015

Checkered Pencil Skirt

 I finally finished my first pencil skirt. I am really happy with it, and am already planning on making a lot more.

First, the fabric. The shell is a lovely soft wool. The checks are black and royal blue. I bought it very cheaply from one of those garage sale pages on Facebook. I only had just enough for the skirt, which did necessitate some creative hemming. The lining is made from a black petticoat my grandma gave me to use. It feels really nice, but the fabric also frays a lot.

The pattern is Vogue 1989, one of those wardrobe pattern collections. It has a double darted pencil skirt, with a slit that I redrafted into a vent, using this really helpful tutorial. I also used this to line the skirt. I was quite concerned on getting this right, so spent a lot of time researching different tutorials on the web. I ended up settling with this one as it seemed the most clear and straightforward. Luckily I got it in first go.

I cut a size 16, no alterations. It took a lot of muslins to work out the correct size. 14 was too tight and 18 much too loose. Three muslins later I found the right size. This was mostly to do with wanting the skirt to feel comfortable. I love the shape of pencil skirts, but I didn't want one too tight, especially as I always tuck in my shirts. It's a good fit, and it's an incredibly comfortable skirt to wear. I think I certainly have a TNT pattern here. I already have another cut in a beautiful purple wool, and am sure there will be a number more.

Onto construction details; first the zipper. I am not entirely happy with it, but am leaving it as is, as all is sturdy, and looks good from the outside. I handpicked the zipper, but sewed donwn the waistband first. In hindsight I should have sewn zip, thn folded the waistband over. It would have given a much neater finish, and I would have been able to use the lining to enclose the entire zipper. Oh well, live and learn.

I got the checks to match incredibly well, but forgot to get a photo. It even impressed my grandmother. She was a professional seamstress, and is very pedantic about things matching. So it was a very high compliment.

Even though my lining went in properly the first time, there is a bit of puckering. This is a cutting fault, not a sewing on, the fabric slipped a little as I was cutting, and I did not have anymore to cut a replacement. It doesn't bother me though.

When it came to hemming I was originally planning to urn up the wool, and hem it to the lining with bias binding covering the raw hem. I couldn't afford to lose any length though, as I like my skirts to fall at the knee. I finished the hem instead with very wide bias tape. Again, not entirely ideal, but next time I will ensure I can get the length right so I can finish it off neatly.


Besides these small flaws, I am incredibly happy with this skirt. I intended it to be a learning curve, and it certainly was. Whilst a pencil skirt itself is not hard to sew, it was trying all these new techniques and details that really made this a good project. I am. now imagining a whole wardrobe of lined pencil skirts, both summer and winter.

Quick note about my red shoes. These heels go with absolutely everything, and are so comfortable I can wear them all day. I was also wearing this outfit with my red coat, but had taken it off for photos.

Has anyone else had any good projects lately that taught you a lot about sewing?


Monday 3 August 2015

A new hair do, and an outfit of pastels for winter.

 Sydney is back to a cold patch of winter, after some unseasonably warm weather the other week. I decided for today's outfit I wanted to move away from my usual winter palate of black, red and plaid, and make use of some new hair ideas.
I used this tutorial of Tasha's. I'd tried it one before with uncurled hair, and it did not work, but this morning it went together without a fault. I cannot get my hair to behave usually so this was a win. I used a new hair scarf I had made the other week using some lovely hydrangea fabric. I need to make some more now, especially in plain colours. I can see myself wearing my hair like this a lot.

My outfit didn't come up too well in these pictures. I am wearing a heavy wool pleated mid-purple skirt, a cream blouse, and my very long blue coat. Earrings and necklace are both pearls. I took these photos in a hidden courtyard at university, isn't it perfect?

Sunday 26 July 2015

Instagram

I finally set myself up an instagram. https://instagram.com/kaitlynssimplyvintage/
Hoping to be able to share some good in progress pictures, the little things that don't warrant a blogpost.

Sunday 19 July 2015

Dress from two vintage 1970's pattern

I am not exactly a fan of 1970's in general, but I do own a very large stash of 1970's sewing patterns that I inherited from my grandmother. Surprisingly most of them are good workable styles and shapes. Always pays to look beyond the decade, or the pattern styling. Back in March when I talked about my fabric plans  I flagged the purple and blue floral left over from my sister's graduation, as a Simplicity 2444/pencil skirt combination. I ended up changing this plan. I wanted to try another bodice style, so went through the stash and found Style 1917. It's a simple bodice with a square neckline and quite a full circle skirt. I started off with the blue version on the right. I didn't muslin the bodice, instead measuring it off my Simplicity 2444 pattern which was pretty spot on (it's anther thing I love about this pattern stash. Most are already in my size) I also made the sleeves. So far so good. The fabric was not wide enough to take the full skirt, so I substituted it for this fantastic four gore skirt, Simplicity 6862. They fitted together easily. This skirt will certainly ended up becoming a well used pattern in its own right. I didn't have any invisible zips, but had a normal one. So I read up on Tasia's tutorial and handpicked it in spot on the first go. I was rather proud of myself.


Now came the trying it on moment. luckily I have a very honest husband, who informed me the sleeve head was much too puffy. I was inclined to agree. So the dress now went sleeveless. I finished off the armholes with bias. The sleeveless version of the pattern has an all in one facing I want to try at some point. I wore the dress last month on an unseasonably hot winter's day for a friend's wedding.
A few thoughts since wearing. Firstly the neck facing is not sitting well, though I under stitched it. I am thinking it needs to be top stitched as well. Secondly there is a smidge too much fabric in the bodice length. This is a common issue. But all in all it was a successful dress. Very wearable. I am looking forward to getting much more wear out of it in the summer, and even trying a new version of the pattern.
Does anyone have any good resources for redrafting sleeve heads. i have a few patterns where I have been trying to use different sleeve patterns, but the final result doesn't end up working.
What have you all been sewing lately? I have a good few projects that are almost finished, and cannot wait to share them with you in the coming weeks.


Monday 1 June 2015

Purses and Bags


 My latest sewing fix has been purses and bags. I started earlier this month when I needed to make Mother's Day presents, and have continued to whip up birthday presents for people
The bags are relatively straight forward. They are made out of curtain fabric samples that came from my grandmother. I don't use a pattern. I determine the size from the fabric at hand minus what I need for the handles. The one to the left was for a family friend's birthday. I also made one in a blue floral for my mother-in-law which I didn't photograph before it was gifted.


The lined, zipped purses I found on Handmade Jane's blog, tutorial here. They are so nice and quick. This one, made again in soft furnishing fabric is self lined, and was made for Mother's Day for my grandmother (the one who taught me how to sew). I did make one in a lovely blue floral cotton for my other grandmother, but I had to post it quickly interstate the morning after I finished it, so no photo.


This one was a Mother's Day present for my Mum. It's made out of leftover scraps from her bridesmaid dresses. It's a beautiful, soft drapey fabric, so it doesn't hold a crisp shape.

Again, no photograph, but I also made one for my aunt for her birthday this weekend out of the same fabric as the bag above.

It's great to have a skill I can put to use at short notice to make presents for people. I am finding it very satisfying. I now have plans to make myself one of these, out o some scrap liberty from a refashion I have yet to blog about. However my zip collection is slowly being depleted, so I will need to stock up soon.


I'm slowly working on redesigning the blog as well. I had a good bit of fun creating the blog header. I don't own any of the patterns shown, but if I did I would certainly be making them up; perhaps I will have to try my drafting skills out sometime.